
We're happy to see you are here for this tutorial on how to customize a Ghost theme using the Ghost CMS dashboard. Ghost is a powerful headless CMS that allows you to create and manage a blog or website without any coding knowledge.
Ghost offers a seamless experience for beginners as well as professionals, thanks to its user-friendly dashboard and highly customizable options. So you can easily change the look and feel of your site to match your brand or style.
If you're looking to customize your Ghost theme, you can do so from the Ghost CMS dashboard. In this blog post, we'll show you how to customize a Ghost theme from the dashboard, including how to change the colors, fonts, layout, and images of your theme.
We will also explain all the options in the Ghost dashboard for customizing Ghost themes. By the end of this blog post, you'll know everything you need to know to customize your Ghost theme from the dashboard. So let's get started now and let your imagination run wild! Need professional help with customization? Here's how to choose a Ghost theme developer who can help.
Overview of the blog, You will known from this blog:
- What is Ghost Themes
- What is a Ghost CMS Dashboard?
- How to install ghost theme.
- Ghost CMS Dashboard introduction.
- How to create post page and tags.
- Summary of the post.
- FAQs
Understanding Ghost Themes
Let's first understand Ghost themes and how they operate before we get into the customization process. The visual organization, functionality, and appearance of your website are all defined by a theme in Ghost. It controls how your content is presented and how visitors engage with your website.
Ghost has a variety of pre-designed themes that you may select from, but modifying a theme enables you to include your own touches and truly make your website stand out from the competition.
What is a Ghost CMS Dashboard?
A Ghost CMS dashboard is the control panel of the Ghost Content Management System. It's where users can manage their blog or publication, create and edit posts, customize the site's appearance, manage settings and user accounts, and monitor site analytics. It provides a centralized hub for efficiently managing and organizing content on a Ghost-powered website.
Accessing the Ghost CMS Dashboard
You must log in to the Ghost CMS dashboard to start customizing your Ghost theme. You may control any element of your website, including themes, content, and settings, from the dashboard. Take the following actions to access the dashboard:
Open a new tab in your web browser and type the address of your Ghost website with the prefix /ghost (for example, www.yourwebsite.com/ghost). Your login information will need to be entered. To access the dashboard, type your username and password. You may begin modifying your Ghost theme as soon as you log in!
Now Follow These Steps for Customizing Your Theme
Ghost Theme Customization
Now we will explore a lot of options from the ghost CMS dashboard to customize the theme. Here, we explain every option in detail for you to learn how to customize your website content, images, or icons from the Ghost dashboard. And also know how to add or edit your website pages, posts, authors, and tags. By following all steps, you can customize your website perfectly.
Before starting to customize your theme, you need to install and activate your preferred theme.
Selecting a Clean Ghost Theme: #1
You must pick a foundation theme that supports your vision for your website before you can begin modifying it. Ghost provides a huge selection of paid and free themes that suit various styles and business sectors. To select a clean ghost theme that fits your requirements, explore the Ghost Marketplace.
Installing and Activating the Theme: #2
After choosing your preferred theme you need to install and activate it. Firstly, log into your Ghost Admin then Go to Settings > Design and click Change theme in the bottom left corner. To import the theme file that you downloaded, click Upload a theme from there. Once the theme has been uploaded, select Activate to make it the default theme for your website. If you face any errors while installing or customizing your theme, be sure to troubleshoot common Ghost theme issues by checking compatibility, theme updates, and Ghost CMS documentation.
Let's introduce all the options in the Ghost CMS Dashboard
In this section, we will vastly explain all the options that you need to know to customize your website.
Settings
The Setting options in the Ghost CMS dashboard empower you to fine-tune your website's functionality and appearance. From managing navigation menus to customizing permalinks, these settings give you control over how your content is structured and presented to your audience.

General
The General option in the Ghost CMS dashboard provides essential settings and configurations for your website. From here, you can customize your site title, tagline, and metadata, ensuring a consistent brand identity. Additionally, you have control over the site's timezone, language, and other general preferences, allowing you to tailor the user experience to your audience.
Go to the General option Click on Setting > General

Publication info: In the general option, you can see this section. In this section, you can change:
- Title & Description: You can change your site title and description for the details used to identify your publication around the web.
- Site timezone: You can set the time and date of your publication, which is used for all published posts.
- Publication Language: You can set your choices of language for your publication.
Site Meta Settings: In the Meta settings options you can set metadata for search engines.
- Metadata: This section has two input fields for giving your site meta title and description for making SEO friendly your website.
- Social Accounts and Cards: In this section, you can add your social accounts and cards like Twitter cards, and Facebook cards to customize the structured data of your site for Twitter and Facebook. You can also add here your social links.
Design
For customizing your site logo, colors, font style, home page layout, and post layout Go to Settings > Design

Now you are on the site design page and you will see the site design options on the left side of this page.

Now we will explain each site design option like Brand, Site-wide, Homepage, and Post.
Brand: After clicking on the Brand option we will see the Site description, Accent color, Publication icon, Publication Logo, and Publication cover. Using these fields, we can easily change the Action Color Publication Icon Publication Logo, and Publication Cover to our liking.

Side-Wide: From site-wide options you can change the navigation layout like the Logo position, Other title fonts change the color scheme like light dark or light mode this option you can change. The options here can be different for each theme, which you can understand by looking that.

Homepage: From the home page you can change more styles of the page like Header style and Post style. The homepage design and style of all themes are not the same, so the options here will be different.

Before starting to customize your theme you need to install and activate your preferred theme
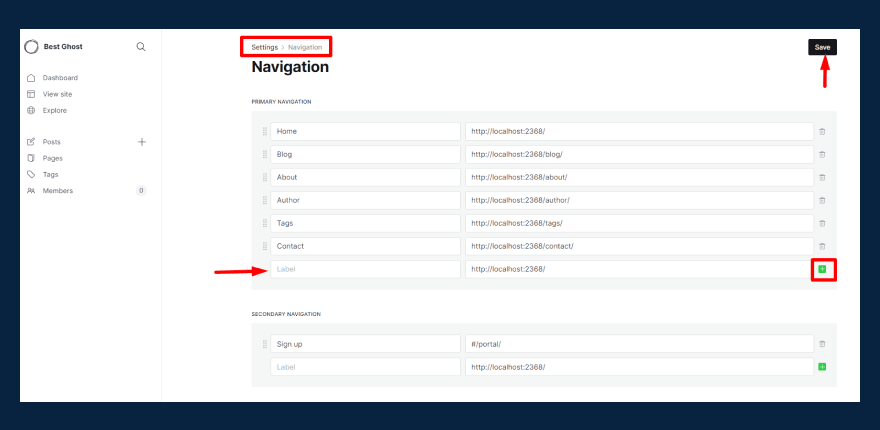
Navigation
You can set up primary and secondary menus from here. To create a menu for your website, you need to go to Settings> Navigation Now you can enter the name of your menu item in the label field if you want to add any page or post behind that menu item, then you need to give those links in the input field next to the click on the plus icon on the right, and your menu will be added. Now you should click on the Save button to add your menu.
Staff
The Staff option in the Ghost CMS dashboard enables you to manage user roles and permissions. You can invite team members, assign them specific roles (such as author or editor), and control their access to content creation, editing, and other administrative tasks.
To access the staff option Go to Settings>Staff

Announcement bar
The Announcement bar option in the Ghost CMS dashboard allows you to create a prominent message or notification that appears at the top of your website. It's an effective way to communicate important updates, promotions, or announcements to your visitors, ensuring they receive the message without being intrusive to the overall site design.
Step 1: Go to Settings > Announcement bar
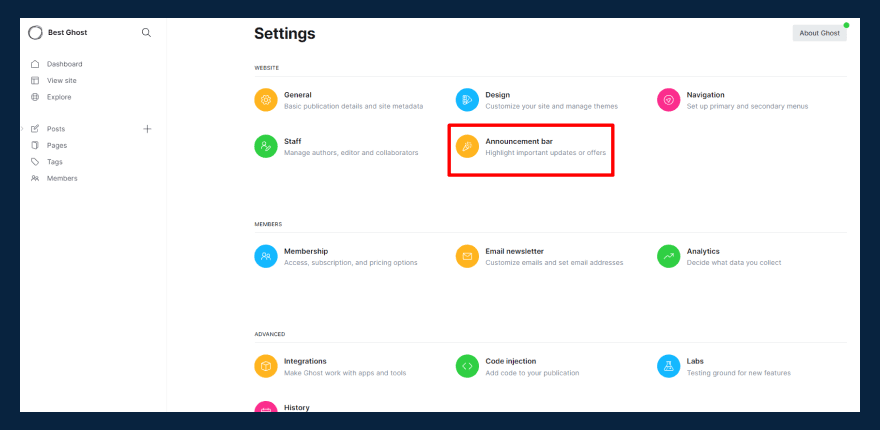
Step 2: Given your content here what you want to show on the announcement bar then click on the save button

Membership
To create and administer a membership system on your website, use the Membership option in the Ghost CMS dashboard. It enables you to monetize your content and create a community of paying members by allowing you to offer unique content, limit access to specific pages or postings, and manage membership plans.
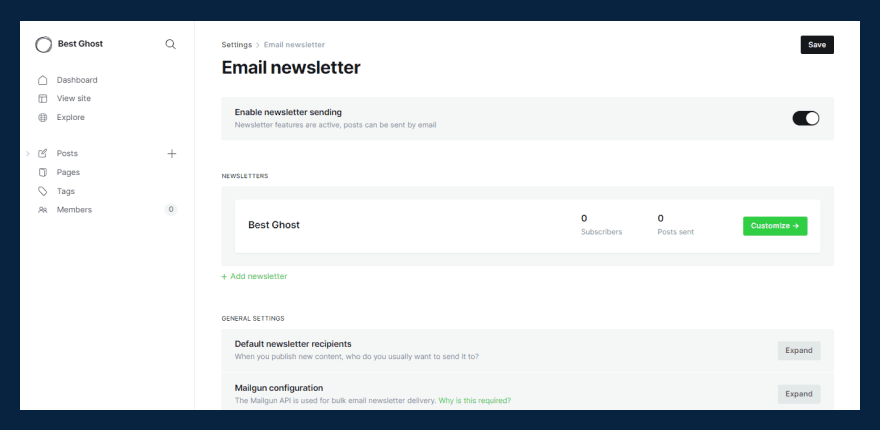
Email Newsletter
Directly sending newsletters to your subscribers is possible when you use the Email Newsletter option in the Ghost CMS dashboard. It offers a simple user interface for creating and planning mailings, maintaining your subscriber list, and monitoring the effectiveness of your newsletter campaigns.
Analytics
The Analytics feature in the Ghost CMS dashboard provides insightful information on the functionality of your website. You can track visitor metrics, page views, referral sources, and other crucial data through its integration with well-known analytics tools, which enables you to assess and improve the performance of your content strategy.
Integrations
You may connect to and integrate third-party services and tools with your website using the Integrations option in the Ghost CMS dashboard. This function offers an easy connection to improve the features and functionalities of your Ghost CMS site, including third-party analytics and marketing systems and bespoke code injections.

Code injection
You may add unique code snippets to your website's header, footer, or post templates by using the Code injection option in the Ghost CMS dashboard. It enables you to add HTML, CSS, or JavaScript code, making it simple to incorporate third-party scripts, tracking scripts, or unique styles to personalize and improve the operation of your website. For advanced customization, you can start editing Ghost themes using the code editor directly in the Ghost CMS dashboard. This allows you to tweak HTML, CSS, and JavaScript for a fully personalized look.

Labs
The Labs option in the Ghost CMS dashboard serves as a dedicated space for testing and exploring new features, including migration options and Ghost beta features.
Migration Option: In this section has three options import and export your site content and delete all content. using these options we can import our site content and export all site content.
Beta Features: In this option, we can see the recently released features of Ghost and we can use them from here.

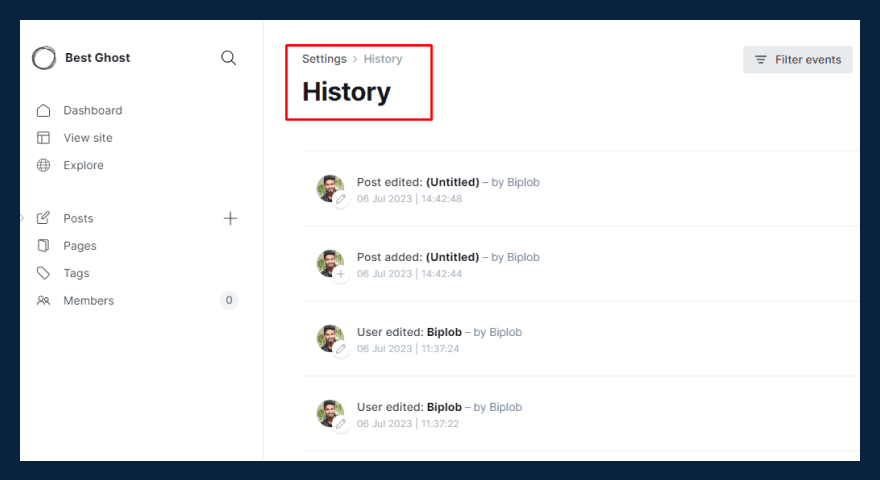
History
The History option in the Ghost CMS dashboard allows you to view and restore previous versions of your content. It provides a comprehensive timeline of changes made to your posts and pages, giving you the ability to track revisions, revert to earlier versions, and maintain a detailed history of content modifications.
Learn about View Site
The View Site option allows you to quickly and easily preview your website as it appears to visitors. By clicking on this option, you can open a new tab or window to view your site in its live state, ensuring that the design, layout, and content are accurately displayed before publishing any changes or updates.

Create Posts
Creating a post in Ghost CMS is a straightforward process that allows you to publish content on your website. By accessing the Ghost CMS dashboard, you can navigate to the Posts section and click on the New Post button.

From there, you can give your post a featured image, a title, and the content using the built-in editor, add media, and set metadata like tags and authors. preview the post, and finally, save or publish it to make it visible on your website. This enables you to easily share your ideas, articles, or any other type of content with your audience.

Create Pages
Creating pages in the Ghost CMS dashboard allows you to add static content to your website, such as an About page or a Contact page. To create a page, go to the Ghost CMS dashboard and navigate to the Pages section. Click on the New Page button to start creating a new page. Enter a title for your page and use the built-in editor to write and format the content.
You can also add media, set metadata, preview the page, and save or publish it to make it visible on your website. Pages provide a way to showcase important information and enhance the overall structure and navigation of your website.

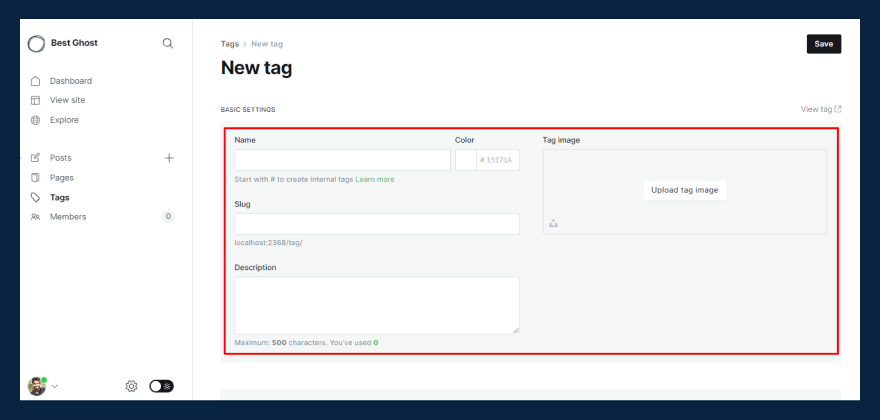
Create Tags
Creating tags in the Ghost CMS dashboard allows you to organize and categorize your content for easier navigation and discovery. To create tags, go to the Ghost CMS dashboard and navigate to the Tags section. Click on the New Tag button to create a new tag. Enter the name of the tag and, optionally, add a description or any other relevant details.
Tags provide a way to label and group related content, making it convenient for visitors to find specific topics or themes on your website. You can assign tags to your posts and pages, enhancing the organization and user experience of your site.
Step 1: Go to the Tags page then click on New tag button.

Step 2: Give your tag name, slug, image, and description in the fields.
Conclusion
To sum up, Using the Ghost CMS dashboard to customize a Ghost theme gives you the ability to design a website that is both beautiful to look at and uniquely yours. You can adjust your theme to fit your brand identity and offer a smooth user experience by following the instructions and advice provided in this guide. To keep your theme interesting and compelling for your visitors, don't forget to experiment, iterate, and refresh it frequently. Now, let your imagination run wild and create a truly one-of-a-kind Ghost website!
FAQS
Do you have any questions about customizing the ghost theme? We have answers to some frequently asked questions on the topic.
Can I customize a Ghost theme without any coding knowledge?
Absolutely! Ghost offers a simple CMS dashboard that enables theme customization without the need for coding expertise. Using the built-in customization options, you may change a variety of features, including colors, fonts, layout, and more.
What are the benefits of customizing a Ghost theme?
There are many benefits to customizing a Ghost theme, including:
- You can change the look and feel of your site to match your brand or style.
- You can add features and functionality to your site that are not available in the default theme.
- You can make your site more user-friendly and engaging.
- You can improve the SEO of your site.
- You can create a unique, one-of-a-kind website.
Can I revert back to the default theme settings if I'm not satisfied with my customizations?
Yes, Ghost gives you the option to return at any time to the default theme settings. Locate the Reset to Default option under the theme options in the CMS dashboard. It can be clicked to return the theme to its default settings.
Can I customize individual pages differently within the same Ghost theme?
Yes, you may design unique page templates with Ghost and apply them to particular pages. This implies that despite using the same theme, you can have various layouts, styles, and functionality for distinct pages.
Can I use custom CSS to further customize my Ghost theme?
Yes, you can improve or replace the default theme styles using custom CSS if you are familiar with the CSS language. Go to the "Code Injection" section of the Ghost CMS dashboard, and then enter your unique CSS code in the relevant field.
How do I create a custom Ghost theme?
You'll need to have a working knowledge of HTML, CSS, and JavaScript in order to build a custom Ghost theme. You can begin by naming a new folder after your theme and adding it to the content/themes directory of your Ghost site.
You May Like it!

CEO and Founder
Enamul Haque is the CEO & Founder of ElectronThemes and a seasoned professional in web development. He is a top-rated freelancer on Upwork and Fiverr and an exclusive author in the ThemeForest.
See all Articles