Social sharing buttons are a great way to encourage your readers to share your content on their own social media channels. This can help to increase your website traffic and reach a wider audience.
There are a few different ways to add social sharing buttons to your Ghost CMS blog posts. One way is to use a third-party service like ShareThis.
These services provide you with a code snippet that you can add to your blog's theme.
Once you have added the code snippet, you will be able to choose which social media platforms you want to include sharing buttons for.
Another way to add social sharing buttons to your Ghost CMS blog posts is to use a custom code injection.
This method gives you more control over the appearance and functionality of your sharing buttons. However, it does require some basic knowledge of HTML and CSS.
In this tutorial, I will show you the process of adding social sharing buttons to your Ghost CMS posts. I will use custom HTML and CSS to integrate these buttons seamlessly into your posts, making your content more shareable.
There are two ways to add social sharing buttons to your Ghost CMS blog posts:
- Using a third-party service
- Manually adding the code
Using a third-party service
There are a number of third-party services that you can use to add social sharing buttons to your Ghost CMS blog posts. Here are the most popular services include: ShareThis
These services are all relatively easy to use and offer a variety of features, such as the ability to choose which social media platforms you want to include, customize the appearance of the buttons, and track how many times your content has been shared.
To add social sharing buttons to your Ghost CMS blog posts using a third-party service, you will typically need to create an account with the service and then install a code snippet on your website.
Now I will show you how to add ShareThis third-party service with your ghost website.
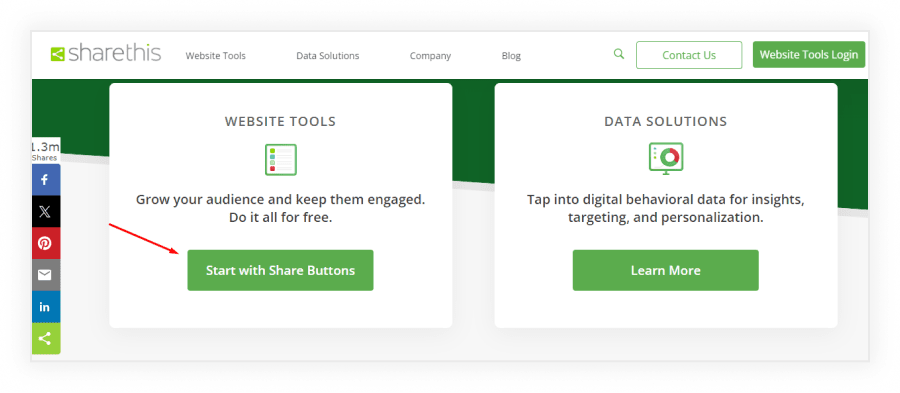
Step 1: Create a ShareThis account
Go to ShareThis website and click on the Start with share Buttons then choose button style and click the next button to create an account.
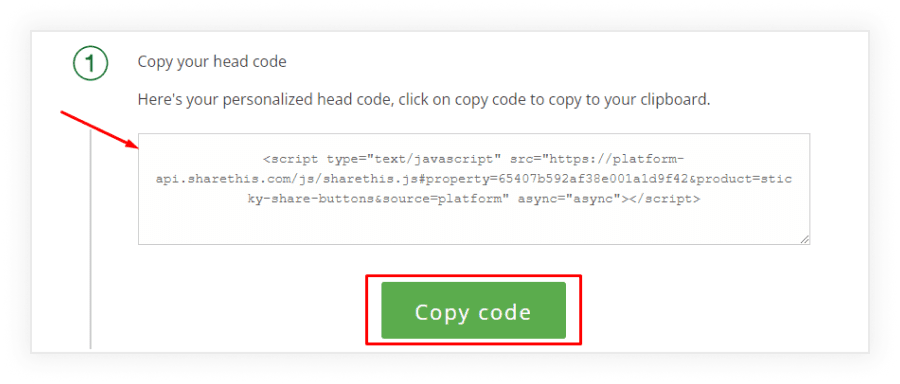
Step 2: Copy the head code and paste it into your theme file.
<script type="text/javascript" src="<https://platform-api.sharethis.com/js/sharethis.js#property=65407b592af38e001a1d9f42&product=sticky-share-buttons&source=platform>" async="async"></script>
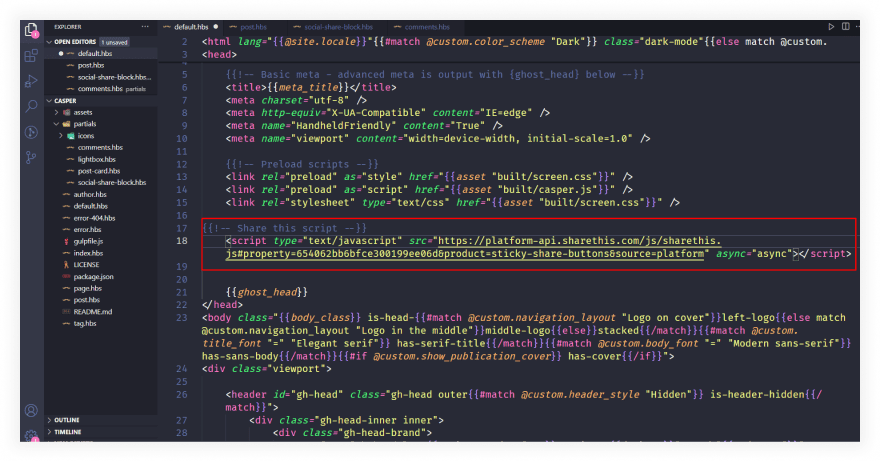
To paste this code open your theme default.hbs file and paste it into the <head>…</head> section. You can also use this code in the site footer before the </body> tag in default.hbs file. you can use code injection to paste this code into the footer.
Step 3: Copy your placement code
Copy the placement code and paste it wherever you’d like your sticky-share buttons to appear on your site.
<div class="sharethis-sticky-share-buttons"></div>
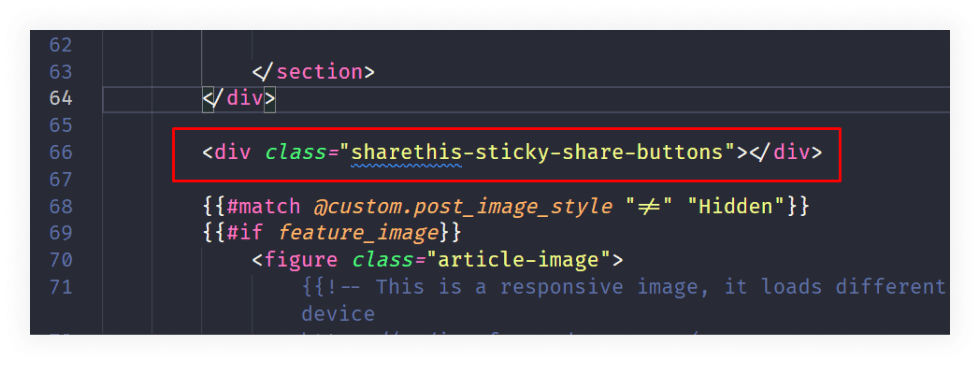
I use this code block in the post.hbs file. I wanted to display the social sharing button after the content section.
Manually adding the code
If you are comfortable editing code, you can also manually add social sharing buttons to your Ghost CMS blog posts.
To do this, you will need to generate the code for the buttons for each social media platform that you want to include.
There are a number of online resources that can help you generate the code for social sharing buttons.
Once you have generated the code, you can add it to your Ghost CMS blog posts by editing the HTML template for your posts.
Similarly, you can explore how to set up Disqus comments to add a powerful commenting system to your blog.
To enhance the user experience when sharing your content, make sure that external links open in a new tab. Follow this simple guide on how to open external links in a new tab in Ghost, making your Ghost site more user-friendly.
Adding code directly to the HTML of the post
To add code directly to the HTML of a Ghost CMS blog post, you will need to open the theme file in the code editor.
Once the theme file is open, you can add the code for the social sharing buttons to the desired location in the post. To add the code follow the steps below:
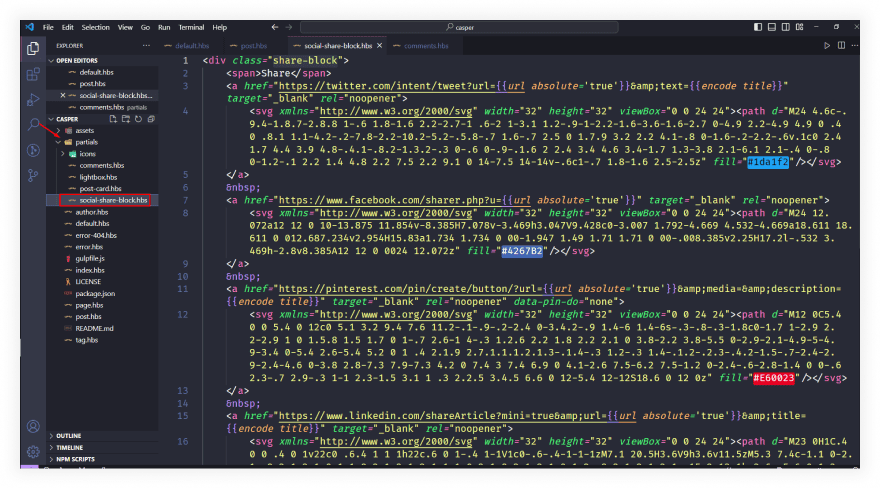
Step 1: Add the HTML Code to Your Theme
- First, create a new file in the
/partialsfolder within your theme calledshare-block.hbs(or similar) and paste the following code:
<div class="social-share-block">
<span>Share</span>
<a href="<https://twitter.com/intent/tweet?url=>{{url absolute='true'}}&text={{encode title}}" target="_blank" rel="noopener">
<svg xmlns="<http://www.w3.org/2000/svg>" width="32" height="32" viewBox="0 0 24 24"><path d="M24 4.6c-.9.4-1.8.7-2.8.8 1-.6 1.8-1.6 2.2-2.7-1 .6-2 1-3.1 1.2-.9-1-2.2-1.6-3.6-1.6-2.7 0-4.9 2.2-4.9 4.9 0 .4 0 .8.1 1.1-4.2-.2-7.8-2.2-10.2-5.2-.5.8-.7 1.6-.7 2.5 0 1.7.9 3.2 2.2 4.1-.8 0-1.6-.2-2.2-.6v.1c0 2.4 1.7 4.4 3.9 4.8-.4.1-.8.2-1.3.2-.3 0-.6 0-.9-.1.6 2 2.4 3.4 4.6 3.4-1.7 1.3-3.8 2.1-6.1 2.1-.4 0-.8 0-1.2-.1 2.2 1.4 4.8 2.2 7.5 2.2 9.1 0 14-7.5 14-14v-.6c1-.7 1.8-1.6 2.5-2.5z" fill="#1da1f2"/></svg>
</a>
<a href="<https://www.facebook.com/sharer.php?u=>{{url absolute='true'}}" target="_blank" rel="noopener">
<svg xmlns="<http://www.w3.org/2000/svg>" width="32" height="32" viewBox="0 0 24 24"><path d="M24 12.072a12 12 0 10-13.875 11.854v-8.385H7.078v-3.469h3.047V9.428c0-3.007 1.792-4.669 4.532-4.669a18.611 18.611 0 012.687.234v2.954H15.83a1.734 1.734 0 00-1.947 1.49 1.71 1.71 0 00-.008.385v2.25H17.2l-.532 3.469h-2.8v8.385A12 12 0 0024 12.072z" fill="#4267B2"/></svg>
</a>
<a href="<https://pinterest.com/pin/create/button/?url=>{{url absolute='true'}}&media=&description={{encode title}}" target="_blank" rel="noopener" data-pin-do="none">
<svg xmlns="<http://www.w3.org/2000/svg>" width="32" height="32" viewBox="0 0 24 24"><path d="M12 0C5.4 0 0 5.4 0 12c0 5.1 3.2 9.4 7.6 11.2-.1-.9-.2-2.4 0-3.4.2-.9 1.4-6 1.4-6s-.3-.8-.3-1.8c0-1.7 1-2.9 2.2-2.9 1 0 1.5.8 1.5 1.7 0 1-.7 2.6-1 4-.3 1.2.6 2.2 1.8 2.2 2.1 0 3.8-2.2 3.8-5.5 0-2.9-2.1-4.9-5-4.9-3.4 0-5.4 2.6-5.4 5.2 0 1 .4 2.1.9 2.7.1.1.1.2.1.3-.1.4-.3 1.2-.3 1.4-.1.2-.2.3-.4.2-1.5-.7-2.4-2.9-2.4-4.6 0-3.8 2.8-7.3 7.9-7.3 4.2 0 7.4 3 7.4 6.9 0 4.1-2.6 7.5-6.2 7.5-1.2 0-2.4-.6-2.8-1.4 0 0-.6 2.3-.7 2.9-.3 1-1 2.3-1.5 3.1 1 .3 2.2.5 3.4.5 6.6 0 12-5.4 12-12S18.6 0 12 0z" fill="#E60023"/></svg>
</a>
<a href="<https://www.linkedin.com/shareArticle?mini=true&url=>{{url absolute='true'}}&title={{encode title}}" target="_blank" rel="noopener">
<svg xmlns="<http://www.w3.org/2000/svg>" width="32" height="32" viewBox="0 0 24 24"><path d="M23 0H1C.4 0 0 .4 0 1v22c0 .6.4 1 1 1h22c.6 0 1-.4 1-1V1c0-.6-.4-1-1-1zM7.1 20.5H3.6V9h3.6v11.5zM5.3 7.4c-1.1 0-2.1-.9-2.1-2.1 0-1.1.9-2.1 2.1-2.1 1.1 0 2.1.9 2.1 2.1 0 1.2-.9 2.1-2.1 2.1zm15.2 13.1h-3.6v-5.6c0-1.3 0-3-1.8-3-1.9 0-2.1 1.4-2.1 2.9v5.7H9.4V9h3.4v1.6c.5-.9 1.6-1.8 3.4-1.8 3.6 0 4.3 2.4 4.3 5.5v6.2z" fill="#2867B2"/></svg>
</a>
</div>
Now, You should insert your share buttons anywhere on your site (multiple times per page if you want) by simply adding {{> share-block}}. I used this code in the post.hbs file in the {{#post}}...{{/post}} block after the content section.
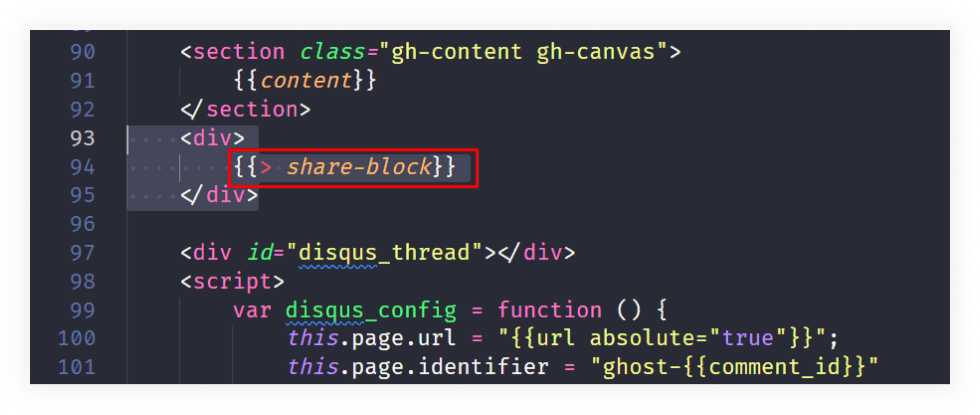
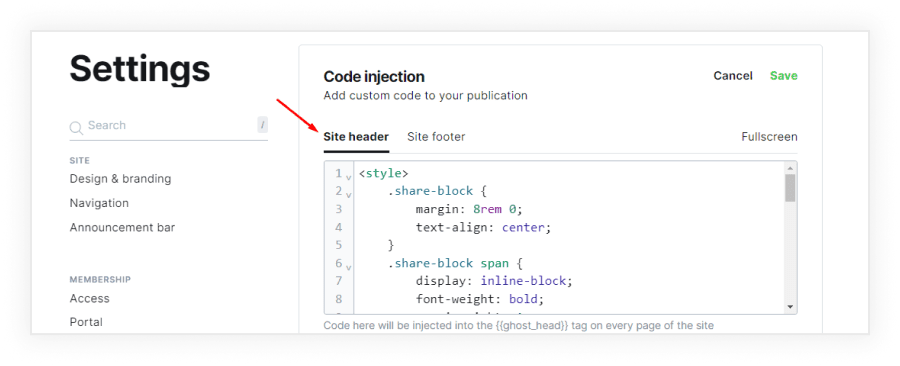
{{#post}}...{{/post}} block to make sure the button links work properly.Step 2: Add the CSS in the Code injection
After completing step one you need to paste the CSS code into your theme using the Code Injection setting with your Ghost admin or you can add it to your theme CSS file.
<style>
    .social-share-block {
        margin-top: 8rem;
        text-align: center;
    }
    .social-share-block span {
        display: inline-block;
        font-weight: bold;
        margin-right: 1rem;
        font-size: 2rem;
    }
    .social-share-block a {
        display: inline-block;
        transition: all 0.3s;
        margin: 0 0.25rem;
    }
    .social-share-block a:hover {
        transform: scale(1.1);
    }
To add via code injection: Go to Dashboard > Settings > Code injection paste the code into the Site Header field and Click on the Save button.
Once you've added the HTML and CSS for your social sharing buttons, save the changes to your theme.
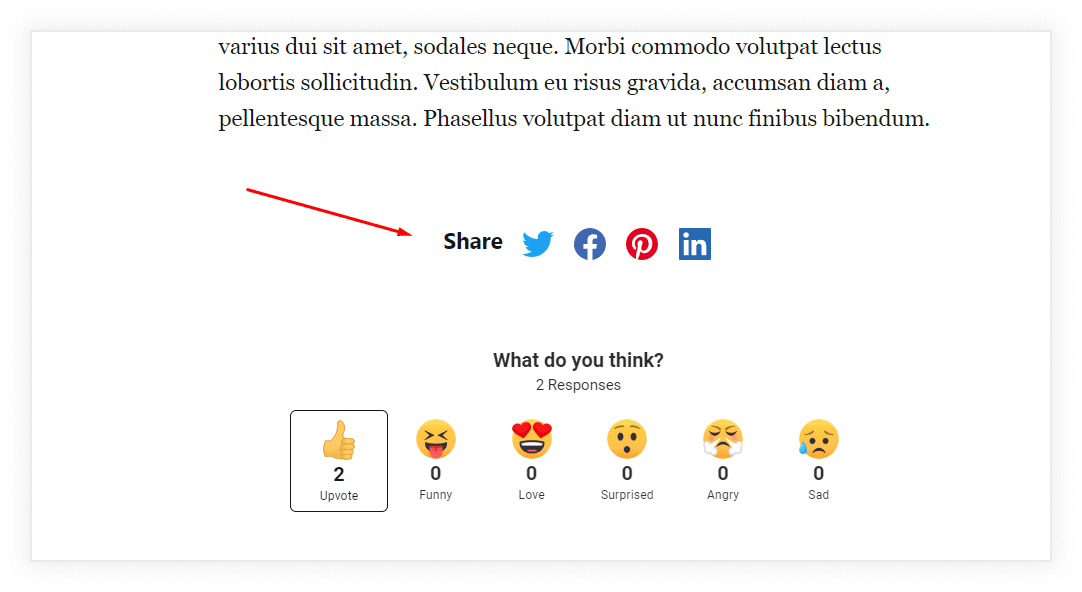
After saving, go to your website and reload it you can preview a blog post to see the buttons in action on your post page.
Conclusion
There are two ways to add social sharing buttons to your Ghost CMS blog posts: using a third-party service or manually adding the code.
The method you choose will depend on your personal preferences and technical expertise.
If you are not comfortable editing code, then using a third-party service is the easiest way to add social sharing buttons to your Ghost CMS blog posts.
However, if you are comfortable editing code, then you can manually add the code for the buttons to your posts or create a code snippet and insert it into each post using the code injection feature.
FAQs
Do you have more questions about how to add a social sharing button on a post in Ghost CMS? We have answers to some frequently asked questions on the topic.
Can I customize the social sharing buttons to match my blog's design?
Yes, you can customize the design of your social sharing buttons by editing the CSS in your theme. This allows you to match the buttons to your blog's overall design and branding.
Do I need to install any plugins to add social sharing buttons to my Ghost CMS?
No, you don't need to install any plugins to add social sharing buttons to your Ghost CMS. This tutorial provides a code-based solution, allowing you to add the buttons directly to your post template without the need for additional plugins.
Do I need to update the social sharing buttons for every new post I create?
If you've added the social sharing buttons to your post template as described in the tutorial, they will automatically appear on every new post you create. You don't need to update them for each individual post.
Post You May Like!
- How to create a Mailgun Account and set up in Ghost– Learn how to create a Mailgun account and integrate it with your Ghost website to streamline email sending and improve your communication with users.
- How to Send an Effective Email Newsletter in Ghost CMS– Discover the best practices for sending effective email newsletters in Ghost CMS, ensuring high engagement and content visibility.
- 16 Best Ghost Themes for a Blog in 2025 (Paid and Free)– Explore the top 16 paid and free Ghost themes for blogs in 2025, designed to boost your website’s performance and design.
- How to Make Money with Your Ghost Website– Learn how to monetize your Ghost website by implementing strategies like memberships, subscriptions, and selling digital products.
- Ghost CMS Security Features: Protect Your Website– Discover Ghost CMS's security features and how to protect your website from potential threats and ensure a safe user experience.

CEO and Founder
Enamul Haque is the CEO & Founder of ElectronThemes and a seasoned professional in web development. He is a top-rated freelancer on Upwork and Fiverr and an exclusive author in the ThemeForest.
See all Articles